Monday, February 27, 2012

Basket Case Beanie

I recently discovered the magic loop knitting method (for a great instructional video, go here). I have tried knitting in the round with double pointed needles (DPNs) but found them a bit annoying due to the lack of flexibility. One of the first things I ever knit in the round was a tea cosy by Loani Prior and she uses 2 circular needles. I liked the method but it had 2 downfalls - you had to buy two of each circular, which can get expensive; and some projects ended up with a bit of a ladder in the gap between the last stitch on one needle and first needle on the next. The magic loop method doesn't really do this.

I'm currently working on a pair of socks using this method and a number of ladies at my craft group were interested to learn how to do it. They decided they wanted to make a beanie so I was tasked to find a pattern. I wanted something simple, but not boring. I like the basket weave stitch. It adds interest, but it has a pretty easy repeat to remember. I didn't like the decrease section of those I found - they didn't incorporate the basket weave. So I decided to write my own!

This hat only has 6 repeats of the basket weave, one less than suggested.


Equipment:
Yarn: 8ply. I have used acrylic, but anything could be used.
Needles: 4mm. I prefer 1 long circular (60cm+) in the magic loop or 2 shorter circulars. DPNs can also be used.
Sizing: The small beanie will fit a head circumference around 56cm; the large beanie will fit a circumference around 61cm (depending on tension). The small beanie should fit most people comfortably. I, however, have a large head, and there is nothing worse that a hat too tight!

Pattern:
Using your preferred method, cast on 113 sts for a small hat or 121sts for a large. The rest of pattern continues the same for both sizes, there is just an extra repeat of the pattern. Split stitches between DPNs or circular needle/s. Ensure the stitches aren’t twisted.

Band
Depending on what method you are using, you may need to place some kind of marker between the after the second last cast on stitch so you know when you’ve completed a round.
Move last cast on stitch onto same needle as first stitch. Knit the first and last stitch together to join work.
Work in K2P2 rib for 10 rounds or until band is desired length.

Body
Rnds 1-4: *K4, P4. Repeat from * around.
Rnds 5-8: *P4, K4. Repeat from * around.
Repeats rounds 1-8 at least 6 more times. If you like a slouchier hat, add more rounds in multiples of eight until the desired length (don’t forget there are also 13 rounds for the decrease).

Decrease
The basket weave pattern continues through the decrease
The number in the brackets is the number of stitches remaining, small hat first, large hat second.

Rnd 1: *K4, P2, P2tog. Repeat from * around. (98/105)
Rnd 2: *K4, P3. Repeat from * around.
Rnd 3: *K2tog, K2, P3. Repeat from * around. (84/90)
Rnd 4: *K3, P3. Repeat from * around.
Rnd 5: *P3, K1, K2tog. Repeat from * around. (70/75)
Rnd 6: *P3, K2. Repeat from * around.
Rnd 7: *P2tog, P1, K2. Repeat from * around. (56/60)
Rnd 8: *P2, K2. Repeat from * around.
Rnd 9: *K2, P2tog. Repeat from * around. (42/45)
Rnd 10: *K2, P1. Repeat from * around.
Rnd 11: *K2tog, P1. Repeat from * around. (28/30)
Rnd 12: *K1, P1. Repeat from * around.
Rnd 13: *P1, K2tog. Repeat from * around. (14/15)
Leave stitches on the needle. Cut yarn leaving a long tail. Using a darning needle, pull the tail through the remaining stitches to bind off. Secure end and trim/darn in.

If you have extended the body length and prefer a beret style hat, block over a dinner plate.

Sunday, November 13, 2011

Corset Fingerless Mitts

I've been working on a number of projects lately - some from patterns and some of my own design. I tried to make these gloves/mitts totally from "scratch" but I was having some issues with the sizing so turned to Snail Spirals' pattern (found here) for some help. 


I found the easiest way to keep track of what I was doing was to use 2 circulars and a pair of DPNs (I would have used 3 circulars, but I didn't have 3 at the time). I separated the back of the hand, the palm of the hand and the thumb gusset onto their own needles. By using this method, it also makes it easy to adapt the pattern for left and right - just move the thumb stitches to one side or the other.
I hope my explanation works for you, but if you have any troubles please write in the comments and I'll get back to you as soon as I can.


For the right hand mitt, the needle order goes: back of hand, thumb, palm. 
For the left hand mitt the needle order is: back of hand, palm, thumb. 


Equipment:
Yarn: Once again I used Moda Vera Marvel 8ply yarn, simply because that's what I had with me at the time. Any 8ply/DK yarn should do the trick. I'm not very good at keeping track of how much yarn I used, but the finished gloves weigh 30g. Obviously you'll need more in your main colour than contrast colour.
Needles: 4mm. As mentioned above I used 2 circs and a pair of DPNs, but you could use all DPNs if you prefer. The magic loop would work, too, but you wouldn't be able to separate the thumb stitches.
Extras: yarn needle for weaving in ends and for threading the lace up. I used yarn for the lace up, but they would also look pretty with ribbon.


Abbreviations:
K = knit
P = purl
S1 K2tog PSSO = slip stitch knitwise, knit  2 stitches together, pass slipped stitch over
YO = yarn over
KFB = knit front and back of stitch


Pattern:
The eyelets are repeated every 4 rounds and once introduced the thumb gusset increases are every 5 rounds. 
Cast on 38 sts using contrasting colour. I wanted to make sure it wasn't too tight so I cast on over 2 needles. Use your preferred stretchy cast on method. Distribute stitches evenly between two circular/DP needles. Work 5 rounds of K1P1 rib.
Rnd 6: change to main colour and knit all stitches
Rnd 7: Back needle K4 YO K4 S1 K2tog PSSO K4 YO K4; K remaining stitches
Rnds 8-10: K all
Rnd 11: as for Rnd 7
Rnds 12-14: K all
Rnd 15: as for Rnd 7
Rnd 16: K all
This is where the thumb gusset starts.
Rnd 17:  K all stitches on first (back of hand) needle. For RH mitt move FIRST two stitches 
and for LH mitt move LAST two stitches from the second (palm) needle to third (thumb) needle. KFB both stitches. There are now 4 stitches on thumb needle. Stitches on the palm needle are knitted also.
Rnd 18: K all
Rn 19: as for Rnd 7
Rnds 20-21: K all
Rnd 22: K all stitches on back & palm needles. KFB first and last stitch on thumb needle (now 6 stitches on needle)
Rnd 23: as for Rnd 7
Rnds 24-26: K all
Rnd 27: Back needle as for Rnd 7; Palm needle knit all; Thumb needle KFB first and last stitch (8 stitches on needle)
Rnds 28-30: K all
Rnd 31: as for Rnd 7
Rnd 32: as for Rnd 22 (10 stitches on needle)
Rnds 33-34: K all
Rnd 35: as for Rnd 7
Rnd 36: K all
Rnd 37: as for Rnd 22 (12 stitches on needle)
Rnd 38: K all
Rnd 39: as for Rnd 7
Rnds 40-41: K all
Rnd 42: as for Rnd 22 (14 stitches on needle)
Rnd 43: as for Rnd 7
The thumb stitches are now going to be held. 
Rnd 44: K all stitches on back needle. It gets a bit fiddly here as only 12 stitches need to be held for the thumb. The first and last stitch are moved back to the palm needle on whatever side the thumb is and two stitches are cast on in between (I used the back loop method). All stitches on palm needle are knitted.
Rnds 45-46: K all (back and palm needles only)
Rnd 47: as for Rnd 7
Rnds 48-50: K all
Rnd 51: as for Rnd 7
Rnd 52: K all
Rnds 53-57: change back to contrasting colour & work in K1P1 rib.
Cast off using the Elizabeth Zimmerman sewn bind off (see Snail Spirals' pattern linked above for details).
Now to finish the thumb.
Redistribute the held stitches over 2 needles. Join contrasting colour yarn. Work 3 rounds in K1P1 rib. Cast off using the same method as above.


Once both gloves are finished, weave in all the ends and lace her up! I used 2 strands of the contrasting yarn. I have the ends woven in on the inside of the glove, but you could also tie them in a bow at the top or bottom of the glove.


If you make these, please link to them on Ravelry or post pictures in the comments - I'd love to see the different colour combinations that you all come up with.


Wednesday, October 5, 2011

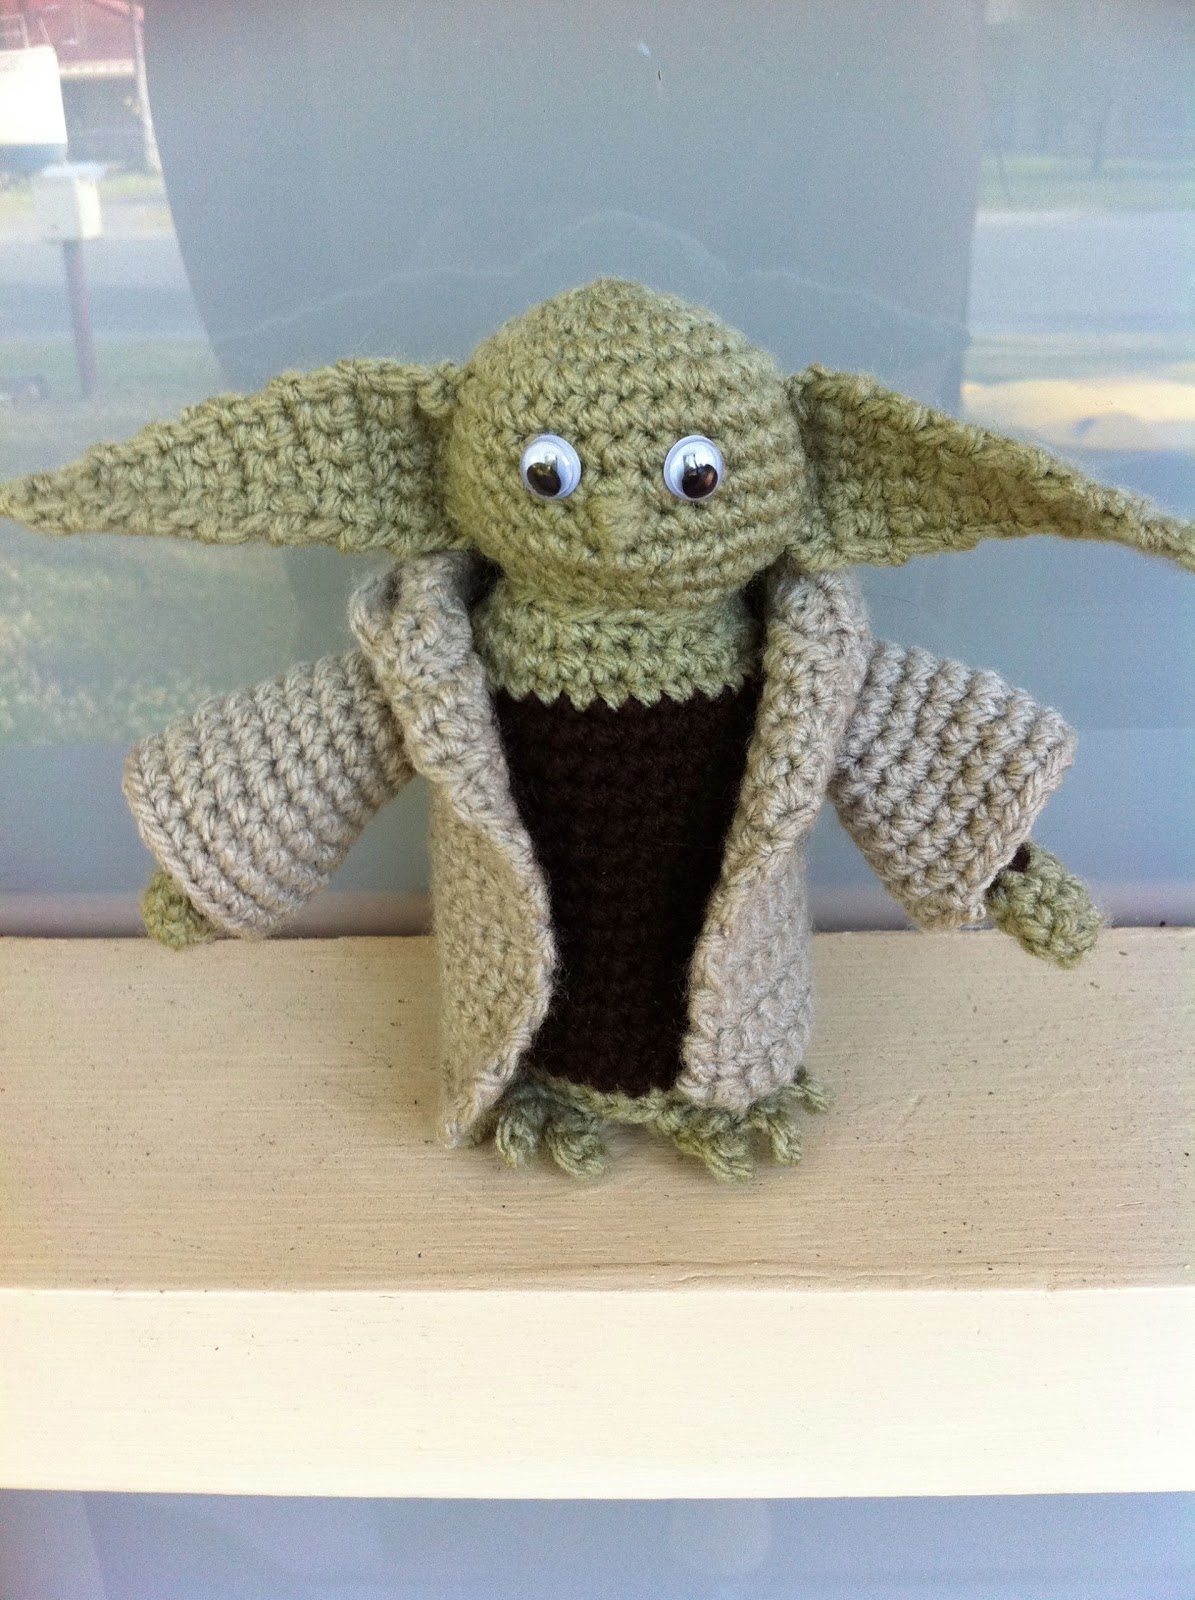
Yoda

I have made a bit of a name for myself at work now. I work in a call centre with about 150 staff. I have people coming up to me and requesting particular crochet items. Keeping with the Star Wars theme, my latest addition is a Yoda.
I had seen another Yoda pattern out there, but I'm known for my attention to detail so decided to come up with my own.


Equipment:
Yarn: Moss/sage green, chocolate brown and fawn/beige. I used Moda Vera Marvel 8 ply. 
Hook: I used a 3mm.
Extras: Yarn needle for weaving in ends, attaching eyes and adding face features; 2 goggle eyes; polyfill or your preferred stuff; dry popcorn/rice/other weighted stuffing


Abbreviations:
CH = Chain
SC = Single Crochet
HDC = Half Double Crochet
SC2tog = Single crochet 2 stitches together
HDC2tog = Half double crochet 2 stitches together


Pattern:
Head
Rnd 1: In green 6 SC in a magic circle
Rnd 2: 2 SC in each SC (12)
Rnd 3: *SC in first stitch, 2 SC in next stitch. Repeat from * around (18)
Rnd 4: *SC in first 2 stitches, 2 SC in next stitch. Repeat from * around (24)
Rnd 5: *SC in first 3 stitches, 2 SC in next stitch. Repeat from * around (30)
Rnd 6 - 10: SC all stitches around
Rnd 11: *SC in first 3 stitches, SC2tog. Repeat from * around (24)
Rnd 12: *SC in first 2 stitches, SC2tog. Repeat from * around (18)
Rnd 13: *SC in first stitch, SC2tog. Repeat from * around (12)
Start stuffing and shaping the head before the opening gets too small
Rnd 14: SC2tog around (6)
FO leaving a tail.
Finish stuffing. Using yarn needle, weave tail through stitches and pull to close opening.


Ears - Make 2
To save me writing it on each line, at the end of each row chain one and turn
Row 1: In green, chain 7. SC in 2nd chain from stitch. SC across row
Row 2: SC across row
Row 3: SC in first two stitches, SC2tog, SC last two stitches (5)
Rows 4 - 6: SC across row
Row 7: SC in first two stitches, SC2tog, SC last stitch (4)
Rows 8 - 11: SC across row
Row 12: SC in first stitch, SC2tog, SC last stitch (3)
Rows 13 - 15: SC across row
Row 16: SC first stitch, SC2tog (2)
Rows 17 - 18: SC across row
Row 19: SC2tog
FO and weave in end


Body:
The body will be worked from the base up.

Rnd 1: In green 6 SC in a magic circle
Rnd 2: 2 SC in each SC (12)
Rnd 3: *SC in first stitch, 2 SC in next stitch. Repeat from * around (18)
Rnd 4: *SC in first 2 stitches, 2 SC in next stitch. Repeat from * around (24)
Rnd 5: *SC in first 3 stitches, 2 SC in next stitch. Repeat from * around (30)
Rnd 6: SC around in back loops only
Rnd 7: Change to brown, SC around
Rnds 8 - 20: SC around
As I worked this in spirals, the last stitch of brown (20th round) did not line up with the first brown stitch so I added 4 more brown stitches before changing to green.
Rnd 21: *SC in first 3 stitches, SC2tog. Repeat from * around (24)
Rnd 22: *SC in first 2 stitches, SC2tog. Repeat from * around (18)
Rnd 23: *SC in first stitch, SC2tog. Repeat from * around (12)
FO and leave a long tail for attaching the head
Fill the body about a quarter to a third of the way up with the popcorn/rice/weighted stuffing. This will help Yoda stand up. Fill the remaining space with polyfill/stuffing of choice.


Arms - Make 2:
Rnd 1: In green 6 SC in a magic circle
Rnds 2 - 3: SC around
Rnd 4: SC in first 3 stitches, CH 2, SC in second chain from hook and SC in stitch at base of chain, SC in last 3 stitches
Rnd 5: SC around, going behind the 'thumb' that was just made
Rnd 6: change to brown and SC around
Rnds 7 - 15: SC around.
Add or remove brown rows so that the arm reaches from the top of the brown part of the body to the base of the body.
FO and leave a tail for attaching to the body. Stuff lightly with a little polyfill.


Feet - Make 2:
Rnd 1: In green 6 SC in a magic circle
Rnd 2: 2 SC in each SC (12)
1st toe: SC in first stitch, CH 3, SC in 2nd CH from hook and next CH, sl st in base SC
2nd toe: SC in next stitch, CH 4, SC in 2nd CH from hook and next 2 CH, sl st in base SC
3rd toe: repeat as for first toe
FO and weave in ends


Assembly:
Attach one ear to each side of the head so it sits a little below half way down. To get the shape don't stitch in a straight line, stitch in a 'C' shape.
Attach feet to the base of the body so that the toes just stick out past the body.
Attach the arms so the tops line up with the top of the brown section of Yoda's body.
Using green thread, start by sewing a his nose so it sits just below the top of his ears. Just below the nose, sew across to make a mouth. Then, line up the eyes so they sit just above and close to either side of the nose. I found it helpful to refer to a picture of Yoda (just do a Google Image search) to get the proportions right. I used 8mm eyes, but i think it would have worked better if they were a little smaller.


Coat:


I have recently discovered the chainless foundation row and I love it! For a great video on how to do it, check out my FAQ page (tab up the top)
To save me writing it on each line, at the end of each row chain one and turn
Row 1: I used 34 stitches - it was enough to almost go all the way around Yoda
Rows 2 - 14: SC across
Add or remove rows as necessary so that fabric reaches Yoda's 'armpits'
Row 15: SC 6 stitches, CH 4 and skip next 4 SC, SC in next stitch, SC until last 10 stitches, CH 4 and skip next 4 SC, SC remaining 6 stitches
Row 16: SC across, SC 4 times in each 4 CH space
Rows 17 - 19: 2HDCtog twice, HDC across until last 4, 2HDCtog twice
Rows 20 - 28: HDC across
Row 29: Hold the fabric so the two ends line up. SC one stitch from each side together. Work until all stitches are joined.
FO and weave in end
Sleeves - make one on each side:
Rnd 1: SC 10 stitches around the hole created in the coat (one in each SC and one in each 'corner')
Rnd 2: *SC in first stitch, 2 SC in next stitch. Repeat from * around (15)
Rnds 3 - 4: SC around
Rnd 5: *SC in first 2 stitches, 2 SC in next stitch. Repeat from * around (20)
Rnd 6 - 8: SC around
Rnd 9: SC 10 stitches, Sl St next stitch
FO and weave in ends


Gently feed Yoda's arms through the sleeves on the coat and he is done!


Yoda and any Star Wars related items found on this blog remain the property of Lucasfilm Ltd


Thursday, September 29, 2011

Crochet Diagonal Stripe & Colour Changes

I've had some questions about how I achieved the stripe on my Hook Monster crochet case. I think the easiest way to explain it would be to draw a chart, so here it is!

As this project was crocheted in the round, so the pattern is worked from right to left each row.


In each row, the colour for the stripe is worked into the second coloured stitch from the row before. The main colour is carried between the stitches and the working yarn at the back. The second colour is left attached and is picked up again on the next round.

To ensure even colouring in your stitches, there is a trick when changing colours. I'll do my best to explain this in words, but I can feel a photo or video tutorial coming on :)
While working the last stitch in the main colour, change to the second colour before pulling the last loop through. So, for an SC stitch you would have a loop on your hook in the main colour, insert hook into the working stitch and YO with main colour and pull through. You now have two loops on the hook in the main colour. Now, yarn over with the new colour and pull through the two loops. Continue working as many coloured stitches as required and use the same method to change back to the main colour.